2/21

Device Configuration


In this chapter, you will learn how to set up the LM3X projector for the first use correctly. After you complete the steps, you will be able to control and manage your LM3X projector conveniently and remotely from the Lumiverse™ web interface hosted at my.lumiverse.com


Note: Cable Internet (DHCP) required for initial device configuration. If configuring outdoors, bring the Internet modem with an Ethernet cable (RJ-45 connector).

Your LM3X projector (LAZR 4G™, LAZR 20K™, LumiBOX™) requires permanent, unrestricted internet access to communicate with Lumiverse™ servers. This connection enables:

  • Remote access and control
  • Firmware updates
  • Media uploads
  • Cloud-based features (scheduling, interactivity, multi-projector sync)
  • Service access

Connection Options

  • Ethernet (LAN) – Most reliable; plug in a cable, unrestricted DHCP networks only. Connect to LAN Internet
  • Wi-Fi - LAN Internet required for initial Wi-Fi configuration. Connect to Wi-Fi Internet
  • Mobile Data (built-in SIM slot) – Insert an activated 4G/5G data SIM card for wireless connectivity. Set up a data SIM card
  • Recommended: Use multiple channels simultaneously for automatic failover and maximum uptime.

LAN Ethernet Connection (Recommended for stability)

The LM3X projector features a robust Ethernet (LAN) port for reliable, high-speed Internet—ideal for permanent outdoor installations where consistent connectivity is critical.

Steps:

  1. Prepare your Ethernet cable (Cat6 or higher recommended for best performance).
  2. For outdoor or weather-exposed use: Always protect the connection with the supplied Neutrik IP65-rated RJ45 connector shield (shield model NEUTRIK NE8MX6-B; included in a plastic bag with your projector). This maintains the projector's waterproof sealing and prevents corrosion.
  3. Plug the RJ45 connector securely into the projector's LAN port.
  4. Connect the other end to your router, switch, or network outlet with DHCP Internet access.

Verification:

Once connected and online, the LUMI "ONLINE" LED indicator on the projector will illuminate (indicating successful internet detection). If the LUMI "ONLINE" LED indicator does not light up:

  • Check cable integrity and connections.
  • Ensure your network provides DHCP (automatic IP assignment)
  • Verify with your network administrator that the required ports are open in any firewall or router. The LM3X device uses specific ports for remote access, updates, and synchronization. View the full list in the Lumiverse™ UI: Settings > Network > Ports. Provide this port list to your IT team to allow inbound/outbound traffic for seamless operation.

Tip: Ethernet offers the lowest latency and highest reliability—prefer it over Wi-Fi or mobile when possible, especially for multi-projector groups or large media uploads.


To get full access to your LM3X projector, you need to log in to the projector's Lumiverse™ account via the web portal. Use Google Chrome web browser for the best experience and maximum compatibility.

  1. Open the Chrome browser and go to my.lumiverse.com
  2. Log in with the username and password provided:
    • Printed on the square-shaped brochure included in the projector box.
    • Also sent to you by email after purchase.

If You’ve Lost Your Credentials

Contact support at support@LM3X.com, providing your projector’s serial number (found on the device label) and proof of ownership: preferably the purchasing invoice.

  • After logging in to Lumiverse™, select the projector (an ID number code identifies the projector, large printed on the projector's body and in the brochure supplied with the projector)
  • Navigate to Settings. At the bottom of the screen, there is the current firmware information. Make sure the projector's firmware is up to date. If not, update the projector before further use.

Adding a data SIM card provides a wireless data (Internet) connection for the projector. With a SIM card installed, you will be able to use the device anywhere within the GSM mobile network signal range. You can purchase data SIM cards from your local mobile service provider, such as Verizon, T-Mobile, or AT&T. Using multiple Internet connections (LAN cable, data SIM card, Wi-Fi) improves reliability through connection redundancy.

  • Purchase a data SIM card from your local GSM/mobile network provider. We recommend using industrial-grade SIM cards (often labeled as supporting a wider temperature range). These are built with thicker materials and are more resilient to thermal expansion/contraction, reducing the risk of loose contacts over time.
  • When purchasing the SIM card, ask your mobile provider for the required APN (Access Point Name) settings. (Alternatively, search the internet or ask an AI for the correct APN setting for your country / mobile provider combination)
  • The provider might require the IMEI code of the projector into which you intend to install the data SIM card. You can find the IMEI code of your projector in your Lumiverse™ Settings > Network > SIM > IMEI
  • Disable SIM PIN Lock (Required). The projector will not accept a SIM card with an active PIN:
    • Insert the card into a regular mobile phone.
    • Go to Phone's Settings > Security > SIM card lock (or similar menu)
    • Disable the PIN requirement and save the changes.
  • Locate the SIM card slot on the LM3X projector (refer to the hardware diagram in the quick-start brochure if needed).
  • Carefully insert the SIM card into the slot. Press it in carefully until it clicks. (When removing the card, press the card slightly inwards the slot; it will click again and release the card.)

SIM cards installed outdoors tend to lose contact over time. Several simple steps can rapidly improve SIM card contact long-term reliability, especially when using a regular non-industrial SIM card:

  • Look for the "SIM card tools" plastic bag supplied with your projector. It contains an IPA WIPE (isopropyl alcohol wipe cleaner) and the dielectric grease - GREASE TF (provided since 2026).
  • Make sure SIM card contacts are perfectly clean. Use the IPA wipe (alternatively, use a lint-free cotton swab soaked in alcohol). Allow everything to fully dry before proceeding. This removes any initial debris, oils, or oxidation that could worsen in cold conditions.
  • Apply a very thin layer of dielectric grease - GREASE TF (alternatively use Loctite LB 8423 or a similar silicone-based, non-conductive product) directly to the SIM card's gold contacts using a clean cotton swab. Spread it evenly in a thin film—avoid excess to prevent buildup. This acts as a protective barrier against moisture, corrosion, and minor gaps caused by temperature changes, while helping maintain consistent electrical contact.
  • If none of the above helps, you can place a small piece of non-conductive tape to thicken the card slightly. This ensures firmer pressure against the slot's pins from the start, countering any potential loosening in cold temps.
  • Make sure the projector is online; a cable LAN Internet connection is required for initial SIM card configuration.
  • SIM card configuration is also possible via direct Wi-Fi access. If cable Internet is not available, proceed to: Configure the SIM card via direct Wi-Fi.
  • Navigate to the projector's Lumiverse > Settings > Network > SIM.
  • Fill in your GSM APN code (Access Point Name, provided by mobile service provider)
  • Click Save
  • Reboot the projector to complete the SIM card configuration process. Main Menu > Power Button (top-right) > Reboot Device
  • Test the SIM card data connection functionality. Remove the LAN cable connection. Examine whether the projectors turns online after several minutes. The square-like LUMI "online" logo on the projector is lit when the projector is online. Check the projector's main Lumiverse™ menu, whether you see the blue Power Button in the top-right corner. If you can see it, the projector is online.
  • Note: The mobile network signal is better outdoors.
  • Insert the SIM card.
  • Switch the projector on after inserting the SIM card.
  • Remain near the projector and use your phone or laptop to search for available Wi-Fi networks.
  • Use your phone or laptop to connect to the TPH xxx Wi-Fi network (xxx = the device ID of your projector). Use default direct Wi-Fi password: see printed manual or contact support at support@LM3X.com
  • When connected to the TPH network, open the Chrome Browser and type '10.1.1.1' in the address bar, then confirm.
  • iPhone/iPad users: If you are experiencing issues connecting to the WebGUI interface, change your GOOGLE CHROME settings. Go to GOOGLE CHROME, go to SETTINGS, and select REQUEST DESKTOP SITE.
  • Welcome to the WebGUI Interface. Select the device you’re using: "PHONE", "TABLET", or a "COMPUTER".
  • Select "ADVANCED".
  • Fill in the "GSM APN" code of your mobile network provider.
  • Select "SET GSM" to confirm the new APN code.
  • Disconnect your device from the TPH network and reconnect to the regular internet.
  • Test the my.lumiverse.com interface to see whether the projector came online. (The projector is online if you can see the Power Button in the top-right corner of the projector's Lumiverse™ Main Menu.)

You can connect the projector to a local Wi-Fi network; this is the third option for connecting the LM3X projector to the Internet. Using multiple connections (LAN cable, data SIM card, Wi-Fi) simultaneously improves overall system reliability through redundancy.

  • A temporary cable LAN or SIM card Internet connection is required for initial Wi-Fi configuration.
  • Navigate to the device's Settings > Network > Wi-Fi
  • Switch the Wi-Fi from Direct mode (projector as hotspot) to Internet Connection mode (connect the projector to your router).
  • Open the SSID drop-down menu and find the Wi-Fi network you wish to connect to
  • Type in the password for the network
  • Click "Save"
  • Navigate to Settings > Advanced > Internal clock
  • Make sure the right Timezone is highlighted
  • After making changes, click Save

The Auto Reboot feature automatically restarts your LM3X projector once every 24 hours. This scheduled refresh clears temporary memory, closes idle processes, and ensures long-term stability and optimal performance—especially important for 24/7 outdoor installations.

During Auto Reboot, the device stops projecting and comes offline for about 10 minutes. After completion, the projector automatically returns to normal operation with all settings, projects, and playlists intact.

Always keep Automatic Reboot enabled. Deactivating it is not recommended for continuous outdoor use. The recommended Auto Reboot timing is early in the morning, about two hours before sunrise.

  • Navigate to Settings > Advanced > Automatic Reboot
  • Make sure Automatic Reboot Time is set for early morning, about two hours before sunrise

Skip if using a single projector only.

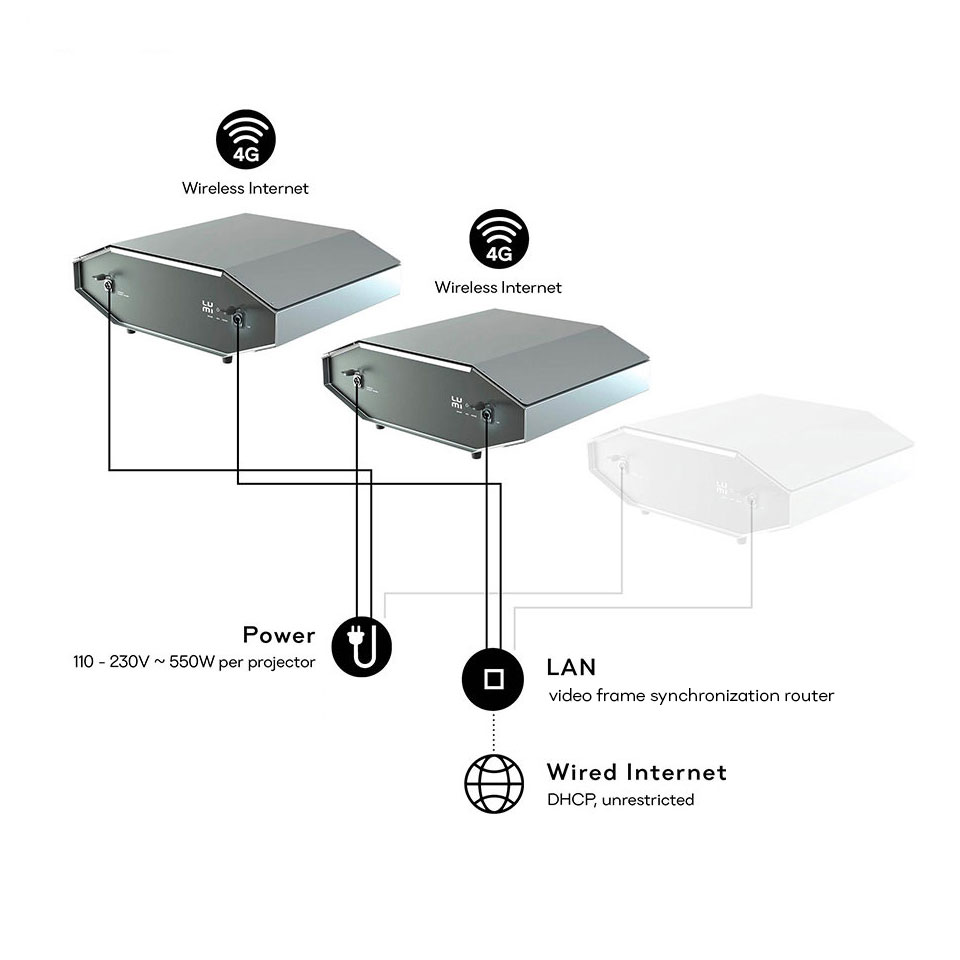
For multi-projector setups (e.g., edge blending, panoramic displays, or large-scale mapping), all projectors in a group must play video frames in perfect time synchronization to avoid visible tearing, drift, or misalignment of the video. The LM3X projectors can synchronize their video frames either over a cable LAN network (the Ethernet Group) or wirelessly via GPS sensors (the Wireless Group).

Ethernet Group Configuration

Cable LAN Sync

  • Navigate to each device > Settings > Network > Ethernet Group Settings, set one (any) projector as Main, and set the other projectors as Secondary. The "Main" projector broadcasts time information, and the "Secondary" projectors listen and follow.
  • Two projectors can connect directly with a LAN cable.
  • Three or more require the official LM3X Video Frame Synchronization Router (available at LM3X.com, or consult your router compatibility with support@LM3X.com)

Wireless Group Configuration

Wireless Sync

  • Navigate to each device's Settings > Advanced > Sensors, and check whether the interface displays "GPS available: yes" and shows GPS data in white font color. If the Sensors interface displays "GPS available: yes" and shows data in white font, your projector is currently receiving wireless synchronization data.
  • If the Sensors interface displays "GPS available: no" and shows GPS data in dimmed blue font, the projector has previously received wireless synchronization data but is not receiving it at the moment.
  • Common causes of a missing GPS signal are: an older projector model, an obstructed sky view, indoor testing, or rare SIM card interference blocking the internal GPS antenna. Contact support@LM3X.com with your projector serial numbers and a description of the installation location. Our technicians will remotely connect to your device, diagnose the issue, and apply a fix or recommend solutions.

Skip if using a single projector only.

The G- Group Controller is a Lumiverse™ interface that sends commands to all projectors in the group simultaneously. For projects involving two or more LM3X projectors (e.g., edge blending, wide panoramas, or synchronized shows), use the G- Group Controller to manage the projectors as a single unified group. G- Group Controller allows centralized control, identical settings across all units, and perfect playback synchronization.

  1. Make sure the group link that starts with G- (e.g., G-Facade2026 or G-EventMain) is present on your main Lumiverse™ homepage after login.
  2. If the G- Group link is visible, click it to open the Group Controller interface. You can tell you’re in Group Controller when you see the "blue house symbol" in the top-left corner of the interface. From here you can:
    • Switch the group on and off.
    • Manage projection schedules.
    • Reboot the group.
    • Add/remove/manage projects.
    • The remaining functions are controlled locally on each device.
  3. If no G- Group link appears
    • Your account does not yet have the group configured.
    • Contact LM3X support at support@LM3X.com with the following details: List of projector serial numbers or IDs you want to group (found on the device label or in your individual projector dashboard) & desired Group Name (e.g., “BuildingFacade”, “SculptureCluster”)
    • Support will create the group, and the G- Group Controller link will appear in your Lumiverse™ interface shortly.

Skip if using a single projector only.

Preloader Time delays the start of playback after the user's input to ensure all data is loaded and the show starts smoothly. Make sure all projectors in the same group have the same Preloader Time value.

  • Navigate to Settings > Advanced > Preloader Time > Scene Delay Time
  • Check all projectors in the group and ensure Scene Delay Time is the same on all; otherwise, a sync mismatch will occur.

We strongly recommend keeping the LM3X projectors online at all times. Communication with Lumiverse™ servers is vital to the system's full functionality. Current offline ability is limited to a single Project, stored in cache. You can cache a project by playing it once. Then, as long as you don't switch to another project, it remains cached and can be played offline with the Projection Scheduler.

Stay tuned, many new offline features will be released in the near future.